


- Non-Structural Column Wraps
- Structural Fiberglass Columns
- Cellular PVC
- Decorative Millwork
- T&G | Shiplap Planks
- Premier Shutters
- Outdoor Living
- Ceiling Beams
- Flexible Mouldings
- Interior Ceilings & Walls
- Wainscoting
- Clearance Items
Shaft Assembly Instructions

The shaft is made up of four panels; they each have a lock mitre joint on each end. The four panels fit into place and allow more surface area for the glue to hold. Simply follow the directions to create a great-looking and perfectly square column. You may glue, pin or nail in place and all corners will be perfectly square. Gluing alone will provide a very strong bond due to the increased area of the miter joint.
Step 1 Measure and cut to the desired length
Step 2 Layout one panel, finished side down on a table. Apply a bead of glue (any outdoor wood glue will do) to the two tongue and groove joints.
Step 3 Take one panel and lock it into the lock mitre joint on one side of the bottom panel. Do the same for the other side.
Step 4 Apply a bead of glue to each end of the "U" you have created and apply the fourth panel.
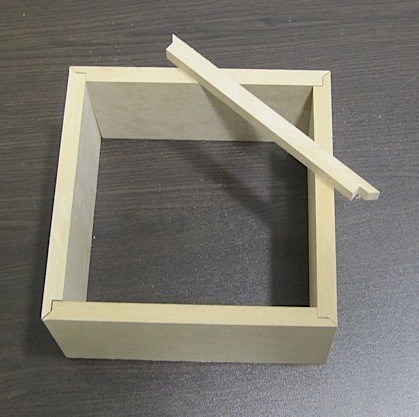
Step 5 You should now use a strap clamp in order to keep the pieces together while the glue dries, and use a few small finishing nails, or, if you own a pneumatic nail gun, use brad nails to hold the corners together while the glue sets. Remember to use a piece of wood between the strap and the panels so as not to damage the finished panels. When the joints are fit tight, our Elite Trimworks lock mitre joint ensures that the corners are square before nailing.