


- Non-Structural Column Wraps
- Structural Fiberglass Columns
- Cellular PVC
- Decorative Millwork
- T&G | Shiplap Planks
- Premier Shutters
- Outdoor Living
- Ceiling Beams
- Flexible Mouldings
- Interior Ceilings & Walls
- Wainscoting
- Clearance Items
Installing Appliques Panels
Advice for Installing Applique Wainscoting
Appliques wainscoting is a lower wall treatment that is used to provide a more upscale, formal look to a room. Appliques consist of three components: chair-rail, baseboards, and a series of design pieces in between, called Appliques, cut to resemble picture frames.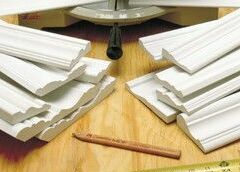
- Suggested tools needed:
- Level
- Compressor with Nail Gun
- Sandpaper
- Tape Measure
- Nail set
- Putty knife
- Miter saw
- Safety glasses
Ordinary drywall, while commonly used in today's homes, lacks the texture and rich look of wainscot panelling. Wainscoting treatments composed of EliteTrim can be applied to any wall. A very interesting and unique look that can be installed in just one weekend.
- Measure the walls to be covered, and draw a lined layout of the room. Indicate the measurements of the walls on your drawing. Use the measurements to help you determine the number of mouldings to purchase. When purchasing mouldings, keep in mind that you will need to add a 10% waste factor to your total footage.
- Use paper templates of different sizes to determine how large your panels should be and how many you'll need.
- First, install your baseboard mouldings assuming that you do not intend to use the existing ones.
- Determine the height for the chair-rail moulding. Use existing chair rail moulding from other rooms as a reference. If no other rooms have chair rails, set your chair rail height from 32" to 42" from the floor. As a general rule, an 8-foot ceiling would require a 36" height to the top of the chair rail from the floor. A 9-foot ceiling would be 42" to the top.
- Use a level to mark a reference line around the room at the height of the chair rail.
- Use a stud-sensor to locate the wall studs, and mark their locations.
- Use a mitre saw to cut the chair rail to fit each wall. Use 45-degree cuts for corners and 90-degree cuts where the chair rail will butt against a window or door.
- Mitre cuts can be made with either a mitre box or with a power mitre saw. The power saw can be intimidating for beginners but will make cuts more accurately and much faster than a mitre box.
- Use finishing nails to attach the moulding to the wall at each stud. If a nail gun is not available, drill pilot holes first before nailing with a hammer to prevent the wood from splitting. The use of a pneumatic nail gun will make things easier and faster for you. It will allow you to automatically countersink the nail deep enough to make it disappear and allow for easier finishing later.
- Measure and lightly mark the placement of the panels on each wall.
- Use the mitre saw to cut the pieces for each panel. Cut each corner at 45 degrees so that each panel will fit together like a picture frame.
- Before fastening the pieces up using a level to check that each piece is plumb or level as you install it.
- Set the pieces in place. Secure them to the wall with finishing nails. Try to get the nails in the creases, to hide them and make finishing easier later on.
- Fill the nail holes with wood putty or Spackling compound (plaster of Paris), and sand them smooth. Use the spackling to fill any visible seams, usually in the corners.
- After filling all the nail holes you should use paintable latex caulking to close all seams along the sides of the chair rail and the frames. This will seal them and also make the job look more finished. Run your finger over the caulking or use a wet rag to go over it as you go along.
- Use paint to touch up any nicks or scratches over the nail holes. Paint the interior of the panels as desired.
- The wainscoting panels can be finished in many ways other than painting. For instance, wallpaper can be used in the interior of the panels, faux finish painting techniques, or wall washing techniques can also be used.
Design Basics of Applique
Scale and Proportion
In a well-proportioned design, the baseboard is taller than the Chair Rail, and the Chair Rail looks more substantial than the Door Casings. The molding used for the Applique itself is the smallest of the three. All the materials used should be scaled according to the size of the wall they will be applied to.
Balance
The goal is to achieve a symmetrical arrangement, if a wall can hold 3 wall frames; you can make the middle one wider. If a wall can hold 5 frames, make the middle and two end frames narrower. You can use both of these approaches on some walls when doors or windows dictate more or fewer frames.
Intervals
An Interval is the area within an individual wall frame, defined by the frames outside dimensions. Interval height and width can vary as needed to accommodate doors, windows, fireplaces, cabinetry and any other element that may intersect a wall. By holding the margins constant and allowing the dimensions of the intervals to expand and contract in response to wall runs, you can maintain an overall sense of proportion, balance and continuity.
Margins
Margins are the spaces above, below, and in between wall frames. A margin of 2" - 3 inches is recommended. With that said, it is generally recommended that no margin should ever be less than 2" inches. The margin on the top and bottom should be the same throughout the installation except when installing under windows or narrower sections of wall. When a space is too narrow to insert an Applique, leave it empty. When installing under a window frame, the applique width should line up with the outside edge of the window casing. In some situations, this will mean that the vertical margins between the appliques will vary greatly from the rest of the installation.
Interval Width Worksheet
Use the information provided in the following worksheet to determine the width of your Applique intervals. First estimate how many intervals would fit each wall yet be equivalent to each other. For example, if you had a 12 x 18-foot room, you might make an estimate based on 36" wide intervals. The 12-foot wall would have four and the 18-foot wall would have 6. Of course the actual sizes will be smaller because you have to account for the 3" margins.
Follow these steps to determine the Interval widths
- Width of Vertical Margins Multiplied by Number of Vertical Margins
- Length of Wall Run Minus (answer of step #1)
- (Answer for Step 2) Divided by Number of Intervals
- Total from step 3 will give you the average Interval Width.
You should continue to modify estimates for each wall run until you are able to determine the closest possible sets of interval widths for all the walls in the room. This will allow you to create symmetry throughout the room.
Determining Vertical Dimension
In a room with either an 8 or 9-foot ceiling, the recommended Chair- Rail height is 36 or 42 inches respectively. A 60-inch height can also be used if you are looking to make long vertical appliques, this should only be done in a room with a ceiling of 9 feet or more. Avoid heights between 36 and 60 inches, or the room will appear cut in half horizontally.
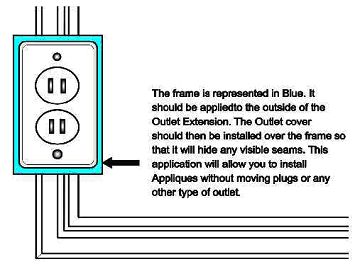
Working around Electrical Outlets
Electrical outlets may not be the only thing you may have to deal with; it could be Cable, Phone Jack, Central Vacuum outlet or a variety of other things the modern world throws at us. If one of the vertical sides of the Applique falls on an outlet, either move the outlet or install an outlet box extension and spacer frame into which you can butt the side of the applique. An outlet extension can be purchased at any big box store. You can create a frame around the extension, to which the applique can be butted, this will finish the outlet nicely.
Applique Layout and Calculations
In this section of the instructions, we will discuss the planning that must take place before the installation begins. This is the most important part of the installation; it will save you time and materials in the long run. Using this example you will learn how to calculate the size and shape of the different Appliques while maintaining symmetry throughout the room. We will go through the different calculations, using an imaginary room with a variety of different situations that you may encounter in your installation.
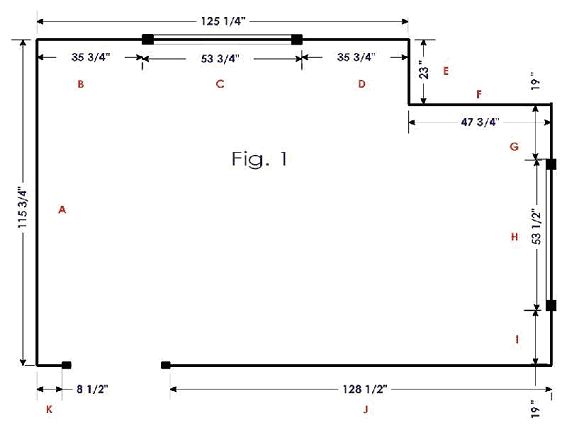
Fig 1 the room has two windows C and H. The measurements used here are to the outside of the Window and Door Casings.
Determining the standard height of the Appliques
As discussed previously in Design Basics of Appliques a few things have to be decided before we start the calculations.
The height of the ceiling in Fig. 1 is 8 feet or 96"
Our Finished height from the floor to the top of the Chair Rail should be 36".
We are using a 3" Chair Rail.
The Base Board installed in the room is 5" in height.
Our Margin should be 3". Margins are the spaces above, below and to the sides of each Applique.
The Intervals or the number of Appliques per wall will vary according to the different dimensions of the walls in the room.
Using the above information we can now determine the standard height of the Appliques we will be installing under the Chair Rail with the exception of the Windows.
Input your own numbers here to get the standard height for your room.
Width of Chair Rail 3"
Width of Upper Horizontal Margin 3"
Width of Lower Horizontal Margin. 3"
Height of Base Board. 5"
The overall finished height of Chair rail minus Sum of Vertical Dimensions (36" 14) ....22"
Therefore each of our Appliqu"s is going to be 22 inches in Height.
Determining Applique Widths
With the first step out of the way we will start with our first wall; Wall A. We have to determine the Width of the Appliques on Wall A.
1. Length of Wall: 115 "
2. Width of Vertical Margins: 3"
3. Number of Intervals desired (Appliques): 4
4. Number of Vertical Margins: 5
5. Step 4 multiplied by Step 2: 15"
6. Step 1 minus Step 5: 100 "
7. Step 6 divided by Step 3: 25 3/16"
Therefore each Applique on wall A is going to be 25 3/16th wide.
Wall B
1. Length of Wall: 35"
2. Width of Vertical Margins: 3"
3. Number of Intervals desired (Appliques): 1
4. Number of Vertical Margins: 2
5. Step 4 multiplied by Step 2: 6
6. Step 1 minus Step 5: 29 "
7. Step 6 divided by Step 3: 29"
Therefore each Applique on wall B is going to be 29" wide.
Wall C
Wall C is a little different in that it has a window, in this case, you must figure out how high to make the Applique that will go under the window. The Chair Rail should be Butt jointed to the Window Casing, always maintaining the same installation height. A Butt joint is when you simply cut the Chair Rail straight and touch the cut end against the outside edge of the Window Casing.
The height from the floor to the bottom of the window sill in this situation is 24". We will not factor in the width of the Chair Rail in this calculation because it will not be run underneath the window however the 3" margins will still be maintained.
Using the calculation chart we used earlier Determining the standard height of the Appliques we know that the total will be.
Height from floor to bottom of the window The total height of margins and baseboard
Or
24" - 11" = 13"
Therefore the height of the appliques under the window will be 13".
Another thing to note is that the overall width of the window should always include the window casing.
1. Length of Wall: 53"
2. Width of Vertical Margins: 3"
3. Number of Intervals desired (Appliques): 2
4. Number of Vertical Margins: 3
5. Step 4 multiplied by Step 2: 9"
6. Step 1 minus Step 5: 44 "
7. Step 6 divided by Step 3: 22 3/8"
Therefore each Applique on wall C is going to be 22 3/8" wide.
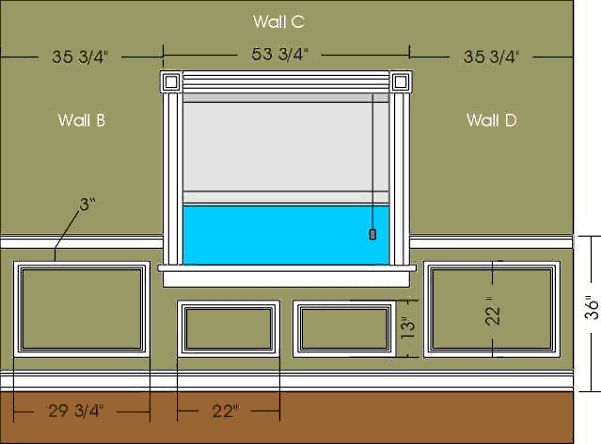
Fig 2 This is a head-on view of walls B, C and D showing the dimensions we calculated and how they relate to the walls in our fictional room.
Here are the sizes of the appliques for the remaining walls. By inputting the dimensions of your own walls into the above formulas, you can easily figure out the Height and Width of the Appliques in your installation.
Wall D . 1 applique at 29
Wall E . 1 applique at 17
Wall F . 2 appliques at 19 3/8
Wall G .. 1 applique at 19
Wall H . 2 appliques at 22 3/8
Wall I .. 1 applique at 19
Wall J .. 4 appliques at 28 3/8
Wall K is too small to apply an applique to; the chair rail should still be installed though. The general rule is that when you have a space that is too small to do, you should just leave it empty.
Symmetry is important in an Applique installation and some people want all the appliques to be as close to each other in size as possible. This is not always possible unless the room is a perfect square. By playing around with different size Margins and the number of Intervals you can adjust the sizing to suit your needs. The above example is simply used to show you how to calculate sizes; you should always take Electrical outlets and other such things into account as they will play an important role in the layout of a room.